Ellie House GCSE photography
Pinhole photography
About his work - Steven Pippin completed his degree in mechanical engineering, he then decided to take a foundation course in art. he took this foundation course at Loughborough college in 1981 to 1982. Pippin usually uses objects such as baths, wardrobes and washing machines converted into something that can be used as a pinhole camera. The conversion from an object like a washing machine to a pinhole camera is as important as the results given from it.
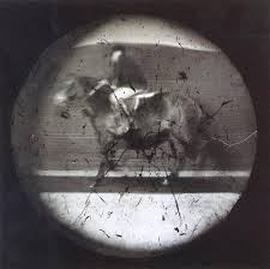
This photograph has a man riding a horse in front of the camera. The horse and man both look like they are travelling at high speeds. The photograph is circular because that is the shape of the lense. This photograph was created using a row of washing machines. Round the edges its darker, this is because light cannot get into the pinhole camera so it becomes darker. The blurryness of the photograph could be to do with the horse travelling at high speed and could also be to do with the object or 'pinhole camera' not being able to focus on the image. I think the image is partly transparent because of natural light which is affecting the appearance of the photograph because the pinhole camera cannot control the light coming through the image. If I could ask the photographer a question. I would ask him why he chose to take a picture of something so relevant in out everyday lives. Why he chose a horse, and what the story behind the photograph was.
This photograph has a man riding a horse in front of the camera. The horse and man both look like they are travelling at high speeds. The photograph is circular because that is the shape of the lense. This photograph was created using a row of washing machines. Round the edges its darker, this is because light cannot get into the pinhole camera so it becomes darker. The blurryness of the photograph could be to do with the horse travelling at high speed and could also be to do with the object or 'pinhole camera' not being able to focus on the image. I think the image is partly transparent because of natural light which is affecting the appearance of the photograph because the pinhole camera cannot control the light coming through the image. If I could ask the photographer a question. I would ask him why he chose to take a picture of something so relevant in out everyday lives. Why he chose a horse, and what the story behind the photograph was.
How to make a pinhole camera
- First get either a cylindrical or rectangular shaped container, this is going to be the body of your pinhole camera. try and make sure the box or can is proportionally similar to the size of a normal camera. for example..an empty paint pot or shoe box.
- After you have found the box or can that you think is appropriate to make a pin hole camera with, paint it all black. You could also cover it fully with aluminium if you felt it was needed. Painting and/or covering your box/can with aluminum and black paint prevents light reflection from occurring. Make sure you paint the whole container black, the lid, inside, outside. After this wait for it to dry.
- Decide the size of your pinhole. The distance between the pinhole and film will affect the look of the end image. The size of the pinhole is also important, this is is because it determines how your photo will look eg - focused or blurry.
- Cut a shutter out of dark paper. Opaque card stock that does not allow any light through works best for this step. Make sure that the paper is thick enough not to fold as it is used.
- Put a piece of tape on the bottom of the shutter flap. Use a less-sticky tape for this side, (electrical tape works great, duct is too strong) and tape down the opposite end of the shutter underneath the pinhole when you are not taking a photo to prevent light from entering the inside of the camera.
- Create a viewfinder out of cardboard. The viewfinder allows you to replicate the geometric relationship of the pinhole to the film and helps you visualize what your final photo will look like.
- After you have found the box or can that you think is appropriate to make a pin hole camera with, paint it all black. You could also cover it fully with aluminium if you felt it was needed. Painting and/or covering your box/can with aluminum and black paint prevents light reflection from occurring. Make sure you paint the whole container black, the lid, inside, outside. After this wait for it to dry.
- Decide the size of your pinhole. The distance between the pinhole and film will affect the look of the end image. The size of the pinhole is also important, this is is because it determines how your photo will look eg - focused or blurry.
- For a container with a 3 to 6-inch distance between each end, use a No. 10 sewing needle pushed about halfway up the needle shaft to make your pinhole.
- Try to make the pinhole as clean of a circle as possible. Twisting the needle as you poke it through helps to make a cleaner hole.
- Cut a shutter out of dark paper. Opaque card stock that does not allow any light through works best for this step. Make sure that the paper is thick enough not to fold as it is used.
- Put a piece of tape on the bottom of the shutter flap. Use a less-sticky tape for this side, (electrical tape works great, duct is too strong) and tape down the opposite end of the shutter underneath the pinhole when you are not taking a photo to prevent light from entering the inside of the camera.
- Create a viewfinder out of cardboard. The viewfinder allows you to replicate the geometric relationship of the pinhole to the film and helps you visualize what your final photo will look like.
